If your laptop camera isn’t working just when you need it most—whether it’s for a video call, an online class, or a remote meeting—you’re not alone. A non-functional webcam can be incredibly frustrating, especially when you don’t know what’s causing the problem. The good news? Most issues where the camera not working on laptop is the concern can be resolved quickly with a few easy steps.
Here, we break down the most common reasons your camera is not working on laptop devices and how to fix them without needing professional tech support.
Content
Follow these 9 Simple methods for Camera Not Working on Laptop.
1. Check for a Camera Switch or Keyboard Shortcut
Start with the basics. Some laptops come with a physical camera shutter or a function key (like F8 or F10) that enables or disables the webcam.
Try this:
- Look along the edges of your laptop screen for a manual shutter switch.
- Press the Fn key along with the function key that has a camera icon to toggle it.
It may seem like a simple fix, but this is a common reason behind the camera not working on laptop issue.
2. Enable Camera Permissions
Your operating system must allow apps to access your camera. If this permission is off, the webcam won’t respond.
For Windows 11:
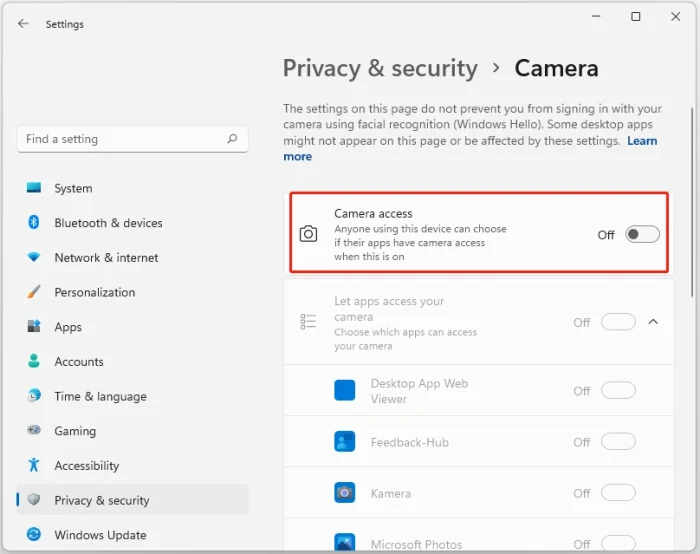
- Open Settings > Privacy & security > Camera.
- Make sure Camera access is turned On.
- Allow camera access for apps like Zoom, Skype, or your browser.
For Windows 10:
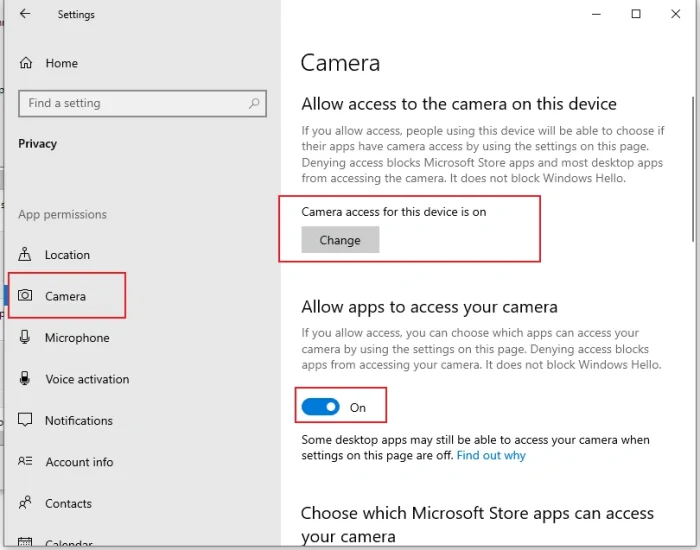
- Go to Settings > Privacy > Camera.
- Ensure Allow apps to access your camera is toggled On.
3. Restart the Laptop
Sometimes a simple reboot can resolve the problem.
Steps:
- Save your work.
- Click Restart from the Start menu.
- Test your webcam using the built-in Camera app or another video calling app.
If the camera not working on laptop persists, continue with further steps.
4. Update the Operating System
Outdated system files or recent software bugs can prevent the camera from working.
On Windows 11:
- Go to Settings > Windows Update > Check for updates.
On Windows 10:
- Navigate to Settings > Update & Security > Windows Update > Check for updates.
Updating your OS can fix bugs and improve compatibility with your webcam.
5. Disable Camera Blocking in Antivirus Software
Many antivirus tools have built-in webcam protection that could block camera access.
Steps:
- Open your antivirus dashboard.
- Look for webcam-related settings.
- Temporarily disable webcam protection.
After checking, re-enable your antivirus for security.
6. Update or Reinstall the Camera Driver
Outdated or corrupt drivers are one of the top causes behind the camera not working on laptop problem.
To update the driver:
- Right-click the Start menu > open Device Manager.
- Expand Cameras or Imaging devices.
- Right-click your camera > select Update driver.
To reinstall:
- Uninstall the camera driver.
- Restart your laptop.
- Windows will reinstall the default driver automatically.
7. Roll Back the Camera Driver
If your camera stopped working after a driver update, rolling back to a previous version might help.
Instructions:
- Open Device Manager.
- Right-click your camera > select Properties.
- Go to the Driver tab > click Roll Back Driver.
If the option is unavailable, no older version exists.
8. Try an Alternative App or External Camera
Sometimes the built-in camera may not work with one specific app.
Try this:
- Launch the Camera app in Windows.
- Test your webcam in a browser-based tool.
- Plug in an external webcam to check if that works.
If the external webcam works fine, the built-in camera may have hardware issues.
9. Check System BIOS Settings
In rare cases, the webcam might be disabled in the BIOS or UEFI firmware.
To access BIOS:
- Restart your laptop.
- Press F2, F12, or Del during boot (depending on the manufacturer).
- Navigate to the device settings.
- Enable the integrated webcam.
Be careful while changing BIOS settings, and only adjust camera-related options.
Final Thoughts
A camera not working on laptop is a common issue faced by many users across different laptop brands and operating systems. Fortunately, these problems are usually software-related and can be resolved with straightforward fixes like checking permissions, updating drivers, or restarting the device.
If you’ve tried every solution and your laptop camera still isn’t functioning, professional help may be necessary. Hardware issues, especially those involving the camera module itself, may require a certified repair technician.
If you want to learn about more technologies, you can visit our website.
FAQs
Why is my camera not working on my laptop?
Your laptop camera might not work due to disabled permissions, outdated drivers, antivirus restrictions, a disabled camera in BIOS, or a simple software glitch. Checking each of these step by step can help you find and fix the issue.
How do I enable the camera on my laptop?
To enable the camera, go to Settings > Privacy > Camera (on Windows), and make sure camera access is turned on for both the device and specific apps. Also, check for a physical switch or a function key on your keyboard that toggles the camera.
How do I reset my camera on my laptop?
To reset your laptop camera, uninstall the camera driver through Device Manager and then restart your laptop. Windows will reinstall the driver automatically. This often resolves corrupted or malfunctioning camera drivers.
Why is my webcam suddenly not working?
If your webcam suddenly stops working, it could be due to a recent driver update, a Windows update, or a third-party software conflict. Restart your laptop, check permissions, and try rolling back the driver if the issue began after an update.

Joel Broussard is an avid blogger on technology, gadgets, and other topics that interest him. He likes to write about his personal experiences with the latest tech products as well as offer advice for people who are looking to buy a new device. When he is not blogging you can find him at home playing video games or watching anime.


