Managing communication efficiently is crucial in any work environment. Sending the same email to multiple recipients individually is not only time-consuming but also prone to mistakes. That’s why learning how to create an email group in Outlook is an essential productivity skill for professionals.
Whether you’re coordinating with a team, reaching out to clients, or managing regular updates, Outlook’s Contact Group feature—commonly referred to as an email group—makes the process faster and more organized. This step-by-step guide will walk you through the setup process and highlight practical tips for maintaining and optimizing your groups.

Content
What Is an Email Group in Outlook?
An email group, also known as a Contact Group, allows you to bundle multiple email addresses under a single group name. When you send a message to that group, Outlook automatically delivers it to every member.
It’s ideal for:
- Internal teams
- Project collaborators
- Customer lists
- Event participants
This built-in Outlook feature simplifies group messaging without requiring third-party tools.
Why Use Contact Groups in Outlook?
Creating an Outlook contact group offers several benefits:
- Saves time: Send one email instead of multiple individual messages.
- Reduces errors: Avoid manually entering each email address.
- Keeps contacts organized: Group people by project, department, or purpose.
- Promotes consistent communication: Ensure everyone gets the same message at the same time.
These groups are particularly helpful for people who manage recurring communications or work with various teams.
How to Create an Email Group in Outlook: Step-by-Step Instructions
Follow these simple steps to create an email group in Outlook and streamline your communication process:
1. Open Outlook and Access the People Tab
Launch Outlook and go to the bottom-left corner. Click the People icon to access your contact list.
2. Click “New Contact Group”
On the toolbar at the top, select New Contact Group. A pop-up window will open for you to configure your new group.
3. Name the Group
Enter a clear, descriptive name—such as “Marketing Team” or “Weekly Reports”—so it’s easy to identify later.
4. Add Members to the Group

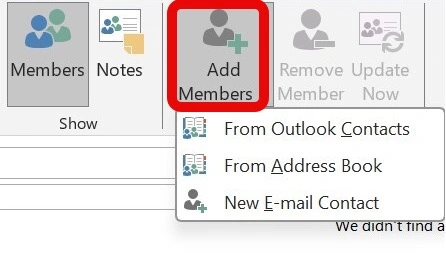
Click Add Members, and choose to add people from your Outlook contacts, your address book, or by entering email addresses manually.
5. Review and Adjust
Double-check the list to ensure it includes all the right contacts. You can update the group at any time to add or remove members.
6. Save the Group
Click Save & Close to finalize your group. Your new contact group is now ready to use.
7. Send an Email to the Group
To email your group, just type the group name in the “To” field when composing a message. Outlooks will auto-fill the recipients.
Maintaining Your Outlook Contact Groups
Creating a group is just the beginning. For consistent and effective communication, regularly review and update your groups. Here’s how:
- Add new contacts as your team or client list grows.
- Remove outdated addresses to avoid bounce-backs.
- Rename groups when their purpose evolves.
A well-maintained group ensures your messages reach the right people every time.
Common Scenarios for Using Email Groups
- Department updates: Send internal news or weekly reports.
- Client communication: Share newsletters or service alerts.
- Project coordination: Keep everyone informed with shared updates.
- Event planning: Reach out to attendees, volunteers, or sponsors.
These examples highlight the practical value of email groups across different industries.
Tips to Optimize Your Email Group Usage
- Use meaningful group names for easy recall.
- Create smaller, focused groups if one becomes too large.
- Avoid using groups for sensitive communication unless necessary.
- Review group lists regularly to keep them accurate.
Efficient email group usage enhances productivity and minimizes communication issues.
Enhance Outlook with HelpDesk Integration
As your communication needs grow, you might consider using a ticketing system like HelpDesk alongside Outlook. HelpDesk organizes incoming emails into support tickets, enabling teams to track issues, assign responsibilities, and automate workflows.
Benefits of Connecting Outlook with HelpDesk:
- Turn emails into manageable tasks.
- Improve team collaboration and visibility.
- Track customer inquiries in a centralized space.
- Access conversation history and performance metrics.
HelpDesk is especially valuable for customer support and service-driven teams looking to elevate their email handling.
Try HelpDesk’s Ticketing System at No Cost
You can experience HelpDesk’s full feature set with a free trial, no credit card required. Discover how it simplifies communication and boosts team efficiency without disrupting your existing Outlook setup.
Final Thoughts
Knowing how to create an email group in Outlook can greatly improve the way you manage communication in your personal or professional life. It helps reduce time spent on repetitive tasks, ensures consistent messaging, and keeps your contacts organized.
Whether you’re sending updates to a project team, distributing company announcements, or keeping in touch with clients, Outlook contact groups are a valuable tool. And when paired with a solution like HelpDesk, your communication system becomes even more robust.
Start by setting up your first group today—and take the first step toward smarter, faster communication.
If you’re facing issues with not receiving emails, here’s a helpful guide to troubleshoot the problem.
FAQs
How do I create a group email list in Outlook?
To create a group email list (also known as a contact group) in Outlook:
1- Open Outlook and click on the People icon at the bottom-left corner.
2- Click New Contact Group in the toolbar.
3- Name your group clearly (e.g., “Marketing Team”).
4- Select Add Members and choose from your contacts, address book, or enter emails manually.
5- Click Save & Close.
You can now use this group name in the “To” field when composing emails to send a message to everyone in the group at once.
How do I set up a new email group?
To set up a new email group in Outlook:
1- Go to the People section of Outlook.
2- Click New Contact Group at the top.
3- Give the group a relevant name.
4- Use Add Members to include contacts from your list or type them manually.
5- Hit Save & Close to finalize your group.
Your new email group is now saved and ready to use whenever you need to email multiple recipients at once.
How do I create a mass email in Outlook?
To send a mass email in Outlook:
1- First, create a Contact Group by grouping all intended recipients.
2- Then compose a new email and type the group name in the “To” field.
3- Outlook will automatically send the email to every contact in that group.
For privacy, especially when emailing people who don’t know each other, use the BCC (Blind Carbon Copy) field to hide recipient addresses.
How to make emails group together in Outlook?
If your Outlook inbox appears disorganized, you can enable Conversation View to group related emails together:
1- Go to the View tab at the top of Outlook.
2- Check the box for Show as Conversations.
3- Choose whether to apply it to just the current folder or all folders.
This will thread emails with the same subject line together, making it easier to follow conversations in your inbox.

Joel Broussard is an avid blogger on technology, gadgets, and other topics that interest him. He likes to write about his personal experiences with the latest tech products as well as offer advice for people who are looking to buy a new device. When he is not blogging you can find him at home playing video games or watching anime.


